This tutorial features a technique some call "Wet-on-Wet Feathering" and is a little different than some of our others. Here we won't show you step-by-step instructions to achieve a very specific design, but rather teach a technique, and a few applications. Practice these designs to get a feel for how the glaze works. After you master these, use your imagination to create your own originals! Don't be afraid to experiment with different colors and other cookie shapes. Have fun!
Bake a batch of cookies using one of our
recipes or your own. Make a batch of frosting using one of our
frosting recipes. One batch of frosting will cover approximately 3 dozen medium cookies.
Turn the finished frosting into glaze by adding 5 Tablespoons of water per batch of meringue powder buttercream, or 3 Tablespoons of water per batch of royal icing. Stir until smooth.
Divide glaze evenly into 3 bowls. Color one red, one pink, and one white. Pour half of each color into squeeze bottles. Cover bowls with plastic wrap and cap bottles when not in use to prevent drying.
NOTE: We use a cookie scraper in our photos. If you don't have one, a toothpick will do.
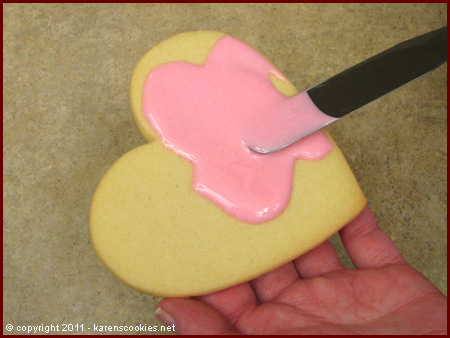
With each design, start with a base coat of glaze. Choose a color and apply an even layer over the cookie. Keep this layer thin to prevent oozing when other colors are added.
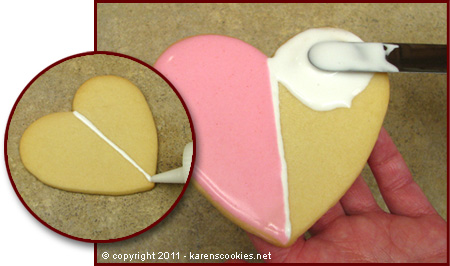
To create multiple background colors, first pipe a dam using a squeeze bottle. Allow this to dry briefly, then glaze each section as described previously.
You're ready to decorate! Before your base dries, finish your design using the following instructions - depending on the desired design.
Helpful Hint: Clean off the tip of your scraper or toothpick between swipes to avoid unwanted color blending!
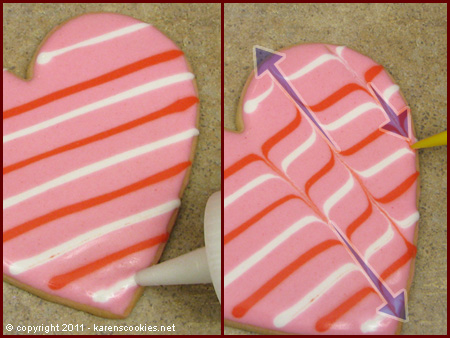
Draw a series of lines across the glazed cookie with a squeeze bottle. Then drag your scraper or toothpick alternately up and down through lines.
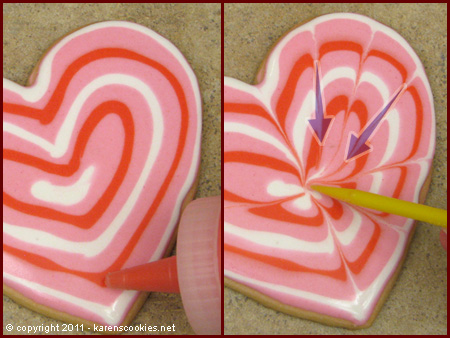
Draw concentric hearts, then drag lines from the outside to the center. For a different look you can drag from the center outward.
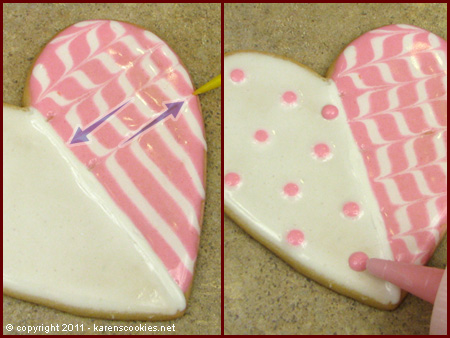
Try two designs on one cookie! Make flat dots by placing your dots while the base is wet, or raised dots by doing so after the base has dried.
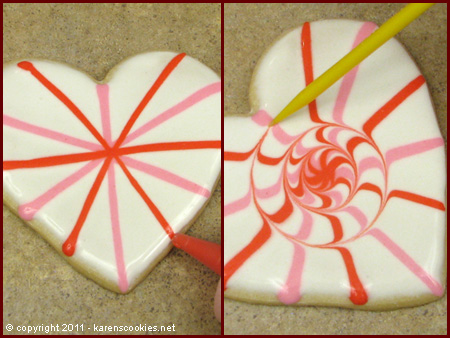
Create a tie-dye look by first drawing lines across the cookie, then dragging the scraper in an outward swirl, starting from the center.
Hearts are fun and easy! Place dots onto your wet glaze using a squeeze bottle, then drag through the entire column in one motion.
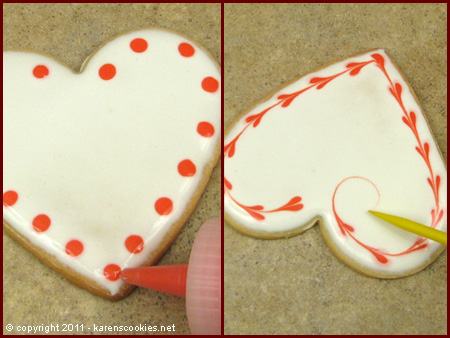
Get creative with your hearts! Here we placed the dots around the outside before dragging through them. We ended with a stylish tail on the last heart.
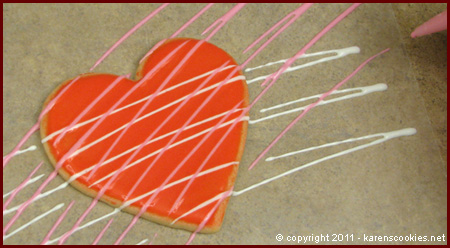
For a fun free-form design, place a cookie on wax paper, then drizzle quick lines back and forth. These lines will lay flat against your background if done when wet, or will be raised if done after base dries.
This technique can be used to decorate several cookies at once. Place cookies close together to prevent waste, and have fun!
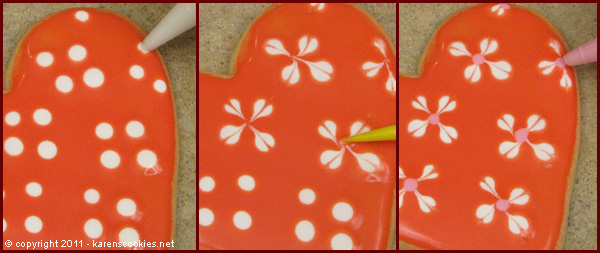
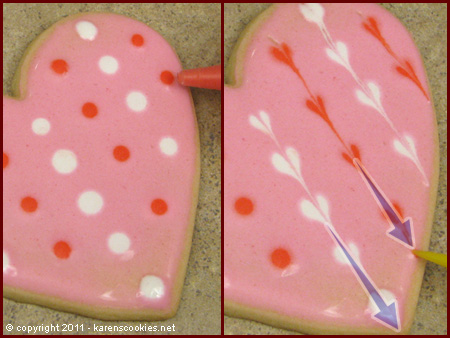
To make flowers, arrange groups of 4 dots. Make heart petals by dragging through each dot toward the center of the grouping. Finish each flower by placing a dot where the tails meet.
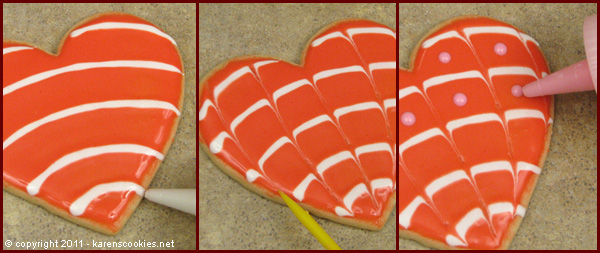
Draw a series of arching lines across heart. Drag your scraper downward through the lines, curving your paths toward the outside edges of the cookie. Finish off with a dot in each section.
Tip: Keep your capped squeeze bottles upside-down in cups. This will keep the glaze
down toward the tip and ready to use!

Hopefully this helps you start thinking of all the countless ways you can apply these techniques to your
own new creations.
Enjoy!