Decorating cookies can be really fun, but it can also be time consuming and even a bit frustrating, especially if you are a beginner. The good news is that there are some simple things you can to make sure it is more fun than frustrating.
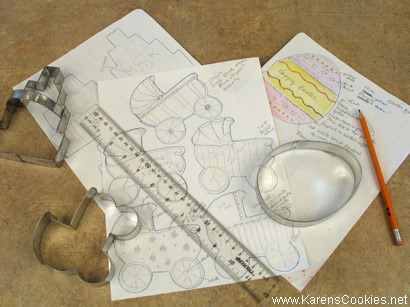
Plan your cookie decorating session well. Decide what cookies you are going to do, and get your cutters together. Once you have them together, figure out what frosting colors you will need and write it all down. I usually sketch out my designs on paper. I trace the cookie cutter so that I know the exact shape and then sketch out the design and make a note of what colors I plan use. If you have trouble figuring out how you want to decorate the shapes, I recommend looking at clip-art, coloring book pages, and any pictures of cookies you can find (check out our Cookie Gallery for ideas). Make a list of the glaze colors you will need as well as your stiffer frosting colors. Also make a note of what tips you will need for each color, and gather them together. If you purchase one of our Cookie Kits, we have done all of this work for you!
Start ahead of time and spread out the work. Maybe you're a marathon-cookie-day kind of person, but not me! I have three small children who don't like to give up their mom for an entire day to the kitchen. I prefer to tackle my projects in little chunks that I can fit into small windows of time throughout my days. I usually make my cookie dough one night and pop it in the fridge. I know that it will be safe in the refrigerator for a few days, so sometime during that few days, I'll make a batch of frosting, color it, put it into bags, and make the glaze colors that I need. I make sure these are all stored airtight until I get a chance to bake the cookies. The next block of time that I find, I'll bake the cookies. While the cookies are baking and cooling, I can clean up my kitchen and make sure I have lots of space to work. I gather together my frosting colors (already made!), tools, sugars, accents, or anything else I'll need and I can get to decorating. If I wanted to, I could even wait till the next day to decorate. I would just put the cookies in an airtight container after they cool and enjoy decorating the next day. Decorating is lots more fun if that's all you're doing that day.
A general rule for decorating is to start at the back and work your way forward, letting each layer dry in between. Start with the main color (usually glaze), then add the next layer, and then the next, working your way up to the last final details. Letting the layers dry before adding more colors will help prevent your colors from bleeding.
If you are decorating a whole big bunch of cookies, think assembly-line. Glaze them all first, then add the next detail on all of them, etc.. I think you will find that it's really not much more work to do 20 cookies than it is to do one. You already have the colors made and the dough made... might as well go for it! :) You can always find people to give them to.
Let finished cookies dry at least overnight before packaging.